Blender Tutorials
Tips and Tutorials for Blending with Cycles
~~~~~~~~~~~~~~~~~~~~~~~~~~~~~~~~~~~~~~~~~~~~~~~
[Blender 2.67] Understanding fac value of Mix Shader in LightPath Info Node Context
A detailed explanation
In numerous Blender 2.6x cycles material nodes tutorials that I've seen, people seem quite confused about the Fac Input of Mix Shader, specially in context of Light Path info node, whose "boolean" outputs like "Is Camera Ray", "Is shadow Ray" etc. can be connected as input to the fac of Mix shader node. People talking in the video tutorials often connect and then switch the inputs to the Mix shader while working with Light Path Info.
It's not that complicated actually.
It's apparent that the mix shader can take two inputs, and a fac value can control how much of each inputs is to be taken. For e.g., while mixing Diffuse BSDF shader with Glossy Shader (connecting the diffuse shader to the first input and glossy shader to the second), if you've kept the fac value to be 0, the result would be only Diffuse material, while 1 would give just the glossy material. A blend of 0.3 would mean 30% of gloss and 70% of diffuse. Thus, we can say that, the fac values decided what percentage of the second input should be combined. Always imagine the slider, zero towards the first input, more towards one is towards the second input.
Now comes the Light Path Info node. Each output socket of the Light Path Info node, gives a boolean result of zero or one. If you connect the "Is Camera Ray" input to fac of a mix shader node, the context is set for the light rays. If the light rays are for the camera (or visible to the camera) then the value would be 1 - which would select the second socket, else 0 - just like if would've entered the value of 1 or 0.
The only difference is that, with the numeric value, you could adjust the slider, or enter any of the values from 0 to 1, like 0.2, 0.5 etc. But with boolean output of lightPath info node, you just have a true or false value, corresponding to zero or one. This makes perfect sense for the context of Light Path info node, where you want to specify material for either (say) the Camera Rays, or the non camera rays.
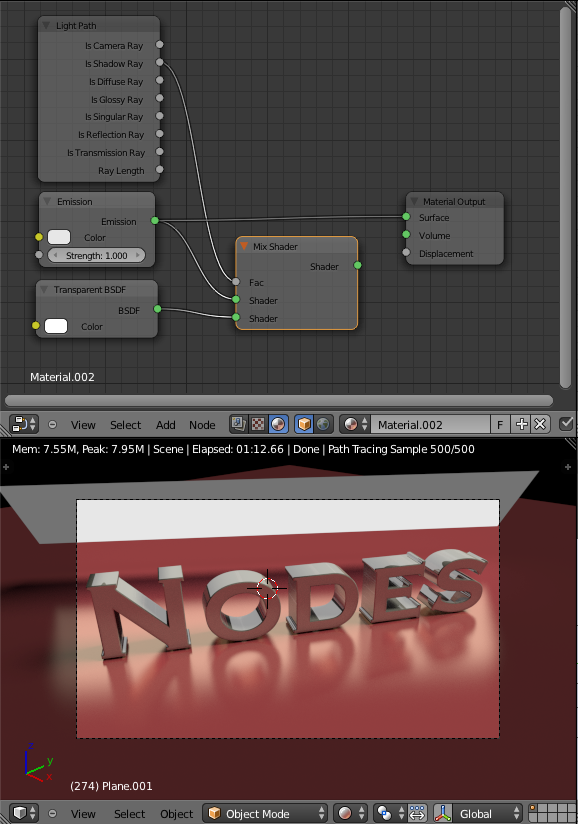
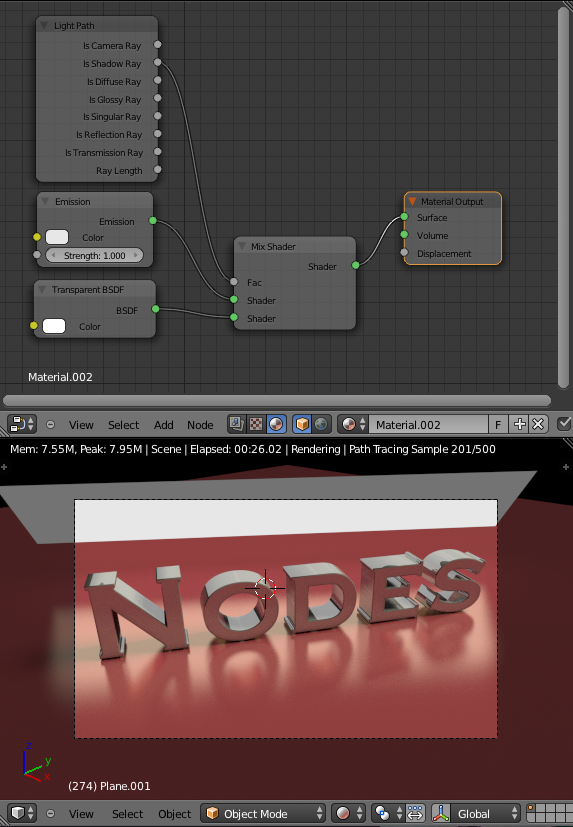
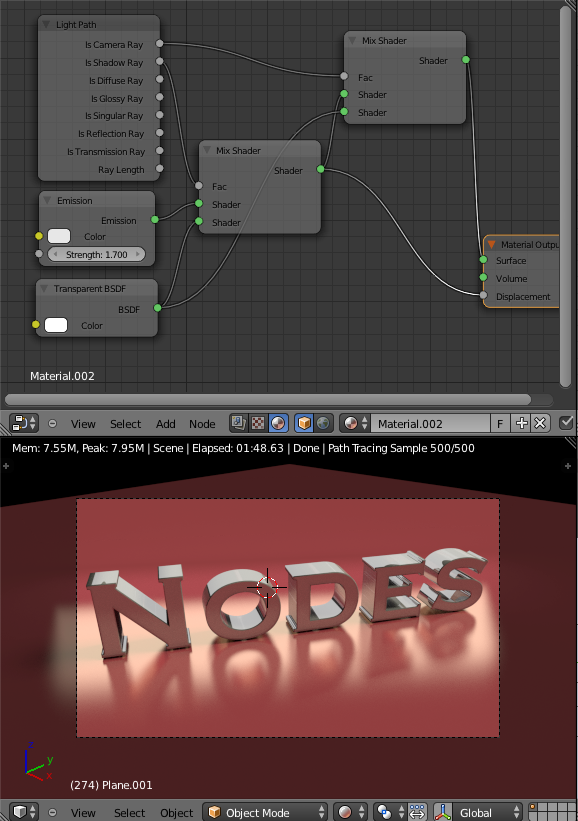
In the figures, first figure shows the plane emitting light and casting shadows. Second, the node setup uses "Is Shadow Ray" output from Light Path info node and makes the material cast transparent shadows. The next figure makes the plane invisible by adding another mix shader node which takes "Is Camera Ray" input to hide the plane from the eye of the camera - whilst it's still illuminating the scene.
You can go a step further, and make the plane cast no reflections. Hint: Will require a couple of mix shaders and both "Is glossy ray" and "Is Transparent Ray"
© 2013, UV Associates
All rights reserved


